How to Test Alcohol Content in Homemade Wine — Methods That Work
When I first started making wine in my garage five years ago, I had no idea how to test alcohol in homemade wine. I’d fermented a batch of blackberry wine for three weeks, tasted it, and thought, “Well, it’s definitely not grape juice anymore.” That wasn’t good enough. I needed actual numbers.
Testing alcohol content matters more than you’d think. It tells you when fermentation is complete. It helps you understand what went right or wrong with your batch. It’s genuinely useful data, not just trivia. And depending on where you live, it might even be legally required if you’re sharing your wine with friends.
I’ve tested hundreds of batches using four different methods. Some are cheap. Some are accurate. Some are both. Here’s what actually works in a home winemaking setup.
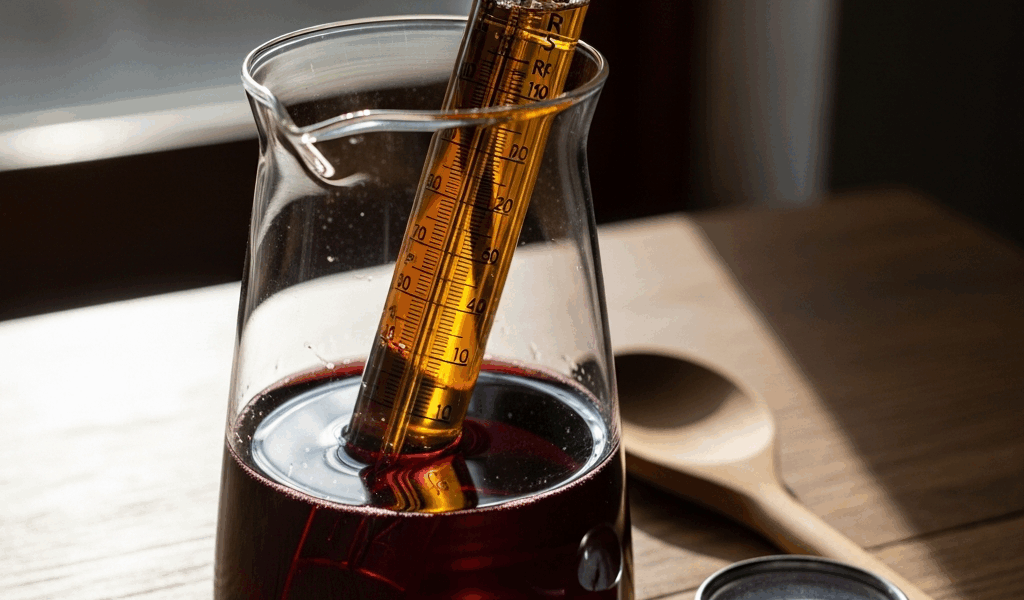
The Hydrometer Method — Simple but Approximate
This is where almost every home winemaker starts. A hydrometer costs $8 to $25. It’s a glass tube weighted at the bottom, designed to float in your wine and measure specific gravity. Simple physics.
The basic math: take your Original Gravity (OG) reading before fermentation starts, subtract your Final Gravity (FG) reading after fermentation ends, and multiply by 131.25. That’s your alcohol content by volume.
Example from my Riesling batch last spring: OG was 1.090. FG was 1.005. The calculation: (1.090 − 1.005) × 131.25 = 11.2% ABV. The hydrometer said the wine was ready when FG stabilized at 1.005 for two consecutive days.
The accuracy is solid—typically within plus or minus 0.5%. That’s good enough for any home operation.
Here’s the catch that actually matters: you have to take the OG reading before fermentation. This sounds obvious until you realize you forgot. I’ve done this. Twice.
If you skipped the OG reading, you have options. Not great ones, but they exist. You can estimate based on your recipe ingredients and compare batch notes from previous years with similar recipes. You can use a refractometer to estimate backwards, though it’s less accurate at that point. Or you can accept that this batch is a measurement mystery and just taste your way through it.
The hydrometer needs a clean sample tube—the glass cylinder it comes with—and a sample taken straight from your carboy. Temperature matters too. Most hydrometers are calibrated to 60°F. If your wine is warmer, the reading will be artificially low. If it’s colder, artificially high. For rough home purposes, this usually doesn’t matter much, but serious winemakers use hydrometer correction charts.
Refractometer Method — Quick but Needs Correction
I bought my refractometer thinking I’d replace my hydrometer entirely. That was naive. Refractometers are fantastic tools, but they’re not straightforward for measuring alcohol in actively fermenting wine.
These devices measure the refraction of light through liquid. They’re expensive—$30 to $80 for a decent one—but they use tiny sample sizes. A single drop. That’s revolutionary when you’ve been dealing with hydrometer sample tubes that need half a cup of wine.
The problem: refractometer readings become inaccurate once fermentation begins. Alcohol and residual sugars both bend light differently than water does. After yeast starts eating sugar, your reading becomes essentially meaningless without correction.
Winemakers use a correction formula to adjust refractometer readings during active fermentation. It’s ugly mathematics. The Nico Bauer formula or similar variants exist online. Honestly, I just plug my numbers into an online calculator like the one at wineoninternet.com rather than wrestling the algebra every time.
When’s this useful? Quick sanity checks. If you want to peek at your wine on day seven and know it’s progressing, a refractometer gives you that instantly without needing a full hydrometer reading. It’s a supplementary tool, not a replacement.
Vinometer — Cheap but Unreliable for Sweet Wines
A vinometer is a thin glass tube with measurement marks. You fill it with wine. Capillary action pulls the wine up to a certain level. That level corresponds to alcohol percentage.
Cost? Under $15. Simplicity? Off the charts. No math required.
Accuracy? That’s where it falls apart.
Vinometers work reasonably well for dry wines—anything below 1% residual sugar. They’re completely unreliable for anything sweet. The capillary action gets confused by sugar molecules. Your reading could be off by two or three percentage points on a sweet wine.
I keep mine in the cabinet as a rough backup check, but I wouldn’t stake my fermentation schedule on it. Think of a vinometer as a novelty verification tool, not a primary measurement device.
A serious winemaker making anything sweeter than off-dry? Skip this entirely and spend those $15 on hydrometer supplies instead.
Ebulliometer — The Professional Answer
An ebulliometer measures the boiling point of wine compared to pure water. Since alcohol lowers the boiling point of water, the difference tells you the alcohol content. It’s elegant science.
It’s also the most accurate home method available. We’re talking accuracy within plus or minus 0.1%. That’s ten times more precise than a hydrometer.
The downside: cost. A decent ebulliometer runs $200 to $400. You need a heat source—a camping stove works. You need small glass vials. You need patience while the thing heats up and cools down. This is a 10-minute process per sample, not a 30-second one.
Who should buy one? Someone making more than 50 gallons of wine annually who genuinely cares about precision. Someone experimenting with new recipes and needs exact data. Someone who’s been making wine for years and has graduated past the “good enough” phase.
If you’re making five gallons of merlot once a year, an ebulliometer is absurd overkill. If you’re running a serious home operation with ten carboys going simultaneously, it pays for itself in confidence alone.
I tested this against my hydrometer readings on a batch of apple wine last fall. The hydrometer said 10.8% ABV. The ebulliometer said 10.7% ABV. For $350, you’re getting that extra decimal point of certainty.
Which Method to Use When
Probably should have opened with this section, honestly. Not everyone needs to own all four tools.
If you’re just starting out: Buy a hydrometer. Spend $15. Record your OG reading before fermentation—write it on the carboy label with a permanent marker. That’s the entire system. You’ll know when fermentation ends. You’ll understand your wine’s alcohol content. The measurement will be reliable.
Once you’ve made five or six batches: Add a vinometer to cross-check your hydrometer. This costs almost nothing. Use them both on finished wine. If they agree within a reasonable range, you’re confident. If they disagree significantly, your hydrometer was your accurate reading. This step teaches you which tools you actually trust.
When you’re serious about winemaking: Consider an ebulliometer if you’re producing volume regularly. Also start keeping detailed batch notes. Temperature. Sugar content of your starting fruit. Hydrometer readings every three days during fermentation. After a year of notes, you’ll see patterns. You’ll understand your setup deeply.
There’s also a practical consideration: what are you making? Testing alcohol content in dry wines using a hydrometer is straightforward. Testing a sweet wine—where residual sugar remains intentionally—requires more care. The hydrometer still works, but you need to understand that what you’re measuring is the sum of both sugar and alcohol density. A refractometer with proper correction formulas becomes more useful here. A vinometer becomes actively unreliable.
Mead makers often prefer ebulliometers because honey ferments unpredictably. A single batch might end completely dry or retain significant residual sugar depending on yeast health and nutrients. Precision matters.
Storage note: Keep your hydrometer in its protective case. These things break if dropped. I learned this lesson expensively. Keep it away from extreme temperature changes. Keep your refractometer dry—water spots on the lens reduce accuracy. An ebulliometer lives in a padded box because $350.
Testing your alcohol content matters. It transforms winemaking from guesswork to actual process control. You’ll understand what happened in each batch. You’ll know when fermentation is genuinely complete versus just slowing down. You’ll make better wine next year because you have data from this year.
Start with a hydrometer. The commitment is minimal. The information gain is massive. Everything else builds from there.


Stay in the loop
Get the latest winemaker's friend updates delivered to your inbox.