How to Build a Wine Cellar That Protects Your Collection

Building a wine cellar represents one of the most rewarding investments for serious wine enthusiasts. Whether you’re converting a basement closet or designing a dedicated room, understanding the fundamentals of proper wine storage will protect your collection and allow bottles to develop beautifully over time.

Why Wine Needs Special Storage

Wine is a living beverage that continues evolving in the bottle. The chemical reactions that transform a young, primary wine into a complex, mature expression depend on precise environmental conditions. Temperature, humidity, light exposure, and vibration all influence how wine develops—or deteriorates.

Most homes simply aren’t designed with wine storage in mind. Kitchen racks expose bottles to cooking heat and light. Refrigerators run too cold and lack humidity. Even temperature-controlled rooms often experience fluctuations that stress wine over time.

A properly designed cellar maintains consistent conditions year-round, protecting your investment while allowing wines to reach their full potential.

Temperature Control Fundamentals

Temperature is the single most critical factor in wine storage. The ideal range sits between 50-59°F (10-15°C), with 55°F (13°C) considered optimal for long-term aging. At this temperature, wines develop slowly and gracefully, building complexity over years or decades.

Higher temperatures accelerate chemical reactions, causing wines to mature too quickly and lose freshness. Wines stored above 70°F (21°C) risk becoming cooked, developing stewed fruit flavors and losing their vibrancy. Extended exposure to heat can permanently damage wine, causing cork expansion and leakage.

Lower temperatures slow maturation but carry their own risks. Below 45°F (7°C), tartrate crystals may form, and extremely cold conditions can freeze wine, potentially pushing out corks or cracking bottles.

Perhaps more important than absolute temperature is consistency. Daily fluctuations cause wine to expand and contract, potentially compromising cork seals and introducing oxygen. A cellar that maintains 60°F year-round will serve you better than one that swings between 50°F in winter and 65°F in summer.

Humidity Requirements

Proper humidity prevents cork deterioration. The ideal range falls between 60-70% relative humidity. In this range, corks stay moist and supple, maintaining their seal against oxygen intrusion.

Too dry and corks shrink, allowing air to enter bottles and oxidize wine. This is particularly problematic in air-conditioned spaces, which can drop humidity below 30%. Signs of cork damage include dried-out cork surfaces, excessive wine level loss, and premature browning.

Too humid and mold becomes a concern. While surface mold on corks or labels is primarily cosmetic, consistently high humidity can damage labels and create an unpleasant musty smell in your cellar. Good ventilation helps manage excess moisture.

If your cellar runs dry, simple solutions include placing a bowl of water near the cooling unit or installing a small humidifier. Gravel floors with occasional watering provide natural humidity regulation in earthen cellars.

Cooling System Options

Unless you’re fortunate enough to have a naturally cool basement, you’ll need mechanical cooling. Several options exist at various price points.

Through-wall cooling units mount directly in an exterior wall, venting heat outside. These self-contained systems suit smaller cellars up to about 1,000 cubic feet. Installation is straightforward, and units are relatively affordable, ranging from $500-2,000 depending on capacity.

Split systems separate the cooling mechanism from the fan unit, allowing more flexible installation and quieter operation. The compressor mounts remotely—in an adjacent room, garage, or outside—while only the evaporator sits in the cellar. These systems suit larger spaces and offer more precise temperature control.

Ducted systems hide all components from view, with cooled air delivered through vents. This approach suits high-end cellars where aesthetics matter and provides the quietest operation. Professional installation and higher equipment costs make this the premium option.

When sizing your cooling system, consider insulation quality, room dimensions, door frequency, and climate. A unit rated for 1,000 cubic feet in a well-insulated space might only handle 600 cubic feet in a poorly insulated room in a hot climate.

Insulation and Vapor Barriers

Proper insulation dramatically improves efficiency and temperature stability. Without adequate insulation, cooling systems work overtime fighting heat infiltration, wasting energy and creating temperature gradients within the cellar.

Aim for R-19 insulation in walls and R-30 in ceilings. Spray foam insulation offers excellent thermal resistance and doubles as a vapor barrier. Traditional fiberglass batts work well when combined with separate vapor barriers.

Vapor barriers prevent moisture migration through walls and ceilings. Without them, warm moist air from adjacent spaces condenses against the cool cellar surfaces, potentially causing mold growth and structural damage. Install vapor barriers on the warm side of insulation—typically facing outward from the cellar.

Don’t overlook the door. A solid-core door with good weather stripping prevents significant heat and humidity exchange. Glass doors, while attractive, require thermal-pane construction to maintain cellar conditions.

Lighting Considerations

Light damages wine by triggering chemical reactions that create unpleasant flavors and aromas. UV radiation poses the greatest threat, which is why wine bottles are typically colored—green and brown glass filters some UV light.

In your cellar, opt for LED lighting. LEDs produce minimal heat and emit virtually no UV radiation. Avoid fluorescent lights, which generate UV, and incandescent bulbs, which produce excessive heat.

Position lights away from bottles, using indirect illumination where possible. Consider motion-activated lighting that only illuminates when you’re in the cellar. The less time bottles spend under lights, the better.

Racking Systems and Organization

How you store bottles affects both accessibility and wine quality. Bottles should rest horizontally, keeping corks in contact with wine to prevent drying. The exception is wines with alternative closures—screw caps and synthetic corks don’t require horizontal storage.

Racking options range from simple wood bins to elaborate custom systems. Traditional diamond bins hold bottles in bulk, maximizing storage density but making specific bottle retrieval challenging. Individual bottle slots offer easy access and organization but use space less efficiently.

Consider a hybrid approach: bulk storage for cases of everyday wines and individual slots for premium bottles you’ll access selectively. Label-forward storage angles bottles slightly, keeping corks wet while allowing label visibility.

Wood remains the classic racking material. Redwood and mahogany resist moisture and won’t impart odors to wine. Metal racks work well in drier cellars but may rust in humid conditions. Avoid pressure-treated lumber, which can emit chemicals.

Organizing Your Collection

A well-organized cellar saves time and prevents forgotten bottles from passing their prime. Several organizational schemes work well.

Organizing by region groups wines geographically—all your Burgundies together, Italian wines in another section. This approach works well for collectors focused on specific regions.

Organizing by grape variety keeps all Cabernets, Pinots, and Chardonnays together regardless of origin. This helps when choosing wine based on food pairings.

Organizing by drinking window groups wines according to when they’ll reach maturity. Early-drinking wines stay accessible near the front; long-term agers go in back corners where they’ll rest undisturbed for years.

Whichever system you choose, maintain a cellar inventory. Apps like CellarTracker and Vivino allow you to track bottles, drinking windows, and tasting notes. Even a simple spreadsheet beats trying to remember what’s buried in back corners.

Cellar Capacity Planning

Most collectors underestimate storage needs. What starts as a modest collection often expands as knowledge and appreciation grow. If budget and space allow, build larger than current requirements suggest.

Calculate capacity by considering acquisition rate versus consumption rate. If you buy a case monthly but only drink a few bottles weekly, your collection grows steadily. Factor in wines held for aging—bottles purchased now but not opened for five or ten years accumulate quickly.

Leave room for case storage of newly acquired wines before integration into your racking system. A staging area prevents the frustration of scrambling for space when deliveries arrive.

Managing Vibration

Vibration disturbs sediment and may interfere with wine’s aging chemistry, though research remains inconclusive about long-term effects. The precautionary approach minimizes vibration sources.

Locate cellars away from mechanical equipment, laundry rooms, and high-traffic areas. Mount cooling units on vibration-dampening pads. Use freestanding racks rather than attaching directly to walls that might transmit vibrations from adjacent spaces.

For most home installations, vibration poses less concern than temperature and humidity. Focus on fundamentals first.

Security Considerations

Valuable collections warrant security measures. A solid door with a good deadbolt prevents casual access. Temperature and humidity alarms alert you to environmental failures before wines suffer damage.

For significant collections, consider insurance riders beyond standard homeowner’s coverage. Document bottles with photos and receipts. Insurance companies may require professional appraisal for high-value cellars.

Budget Considerations

Cellar costs vary enormously based on size, finish level, and DIY involvement. A basic closet conversion might run $1,000-3,000 for insulation, cooling, and simple racking. A professionally designed and built dedicated room easily exceeds $20,000-50,000 or more.

Prioritize function over aesthetics if budget is limited. A well-insulated closet with a proper cooling unit protects wine better than an impressive-looking but poorly controlled display cellar. You can always upgrade finishes later.

Consider starting with a quality wine refrigerator while planning a larger cellar. Modern wine fridges maintain proper conditions for hundreds of bottles at reasonable cost, buying time for cellar construction.

Common Mistakes to Avoid

Undersizing cooling systems ranks among the most common errors. Inadequate cooling leads to temperature creep during hot weather, potentially damaging wine. Always round up when selecting unit capacity.

Neglecting insulation wastes energy and compromises temperature stability. The investment pays for itself through reduced cooling costs and better wine preservation.

Forgetting about access and workflow creates frustration. Design your cellar so you can easily retrieve bottles without disturbing neighbors. Consider how you’ll add new wine and remove empties.

Ignoring humidity often leads to cork failures years later. Monitor humidity from the start and address problems before they damage your collection.

Building a wine cellar requires careful planning but rewards you with decades of properly stored wine that develops exactly as winemakers intended. Start with the fundamentals—temperature, humidity, and darkness—and refine details as your collection grows.

James Sullivan

James Sullivan

Author & Expert

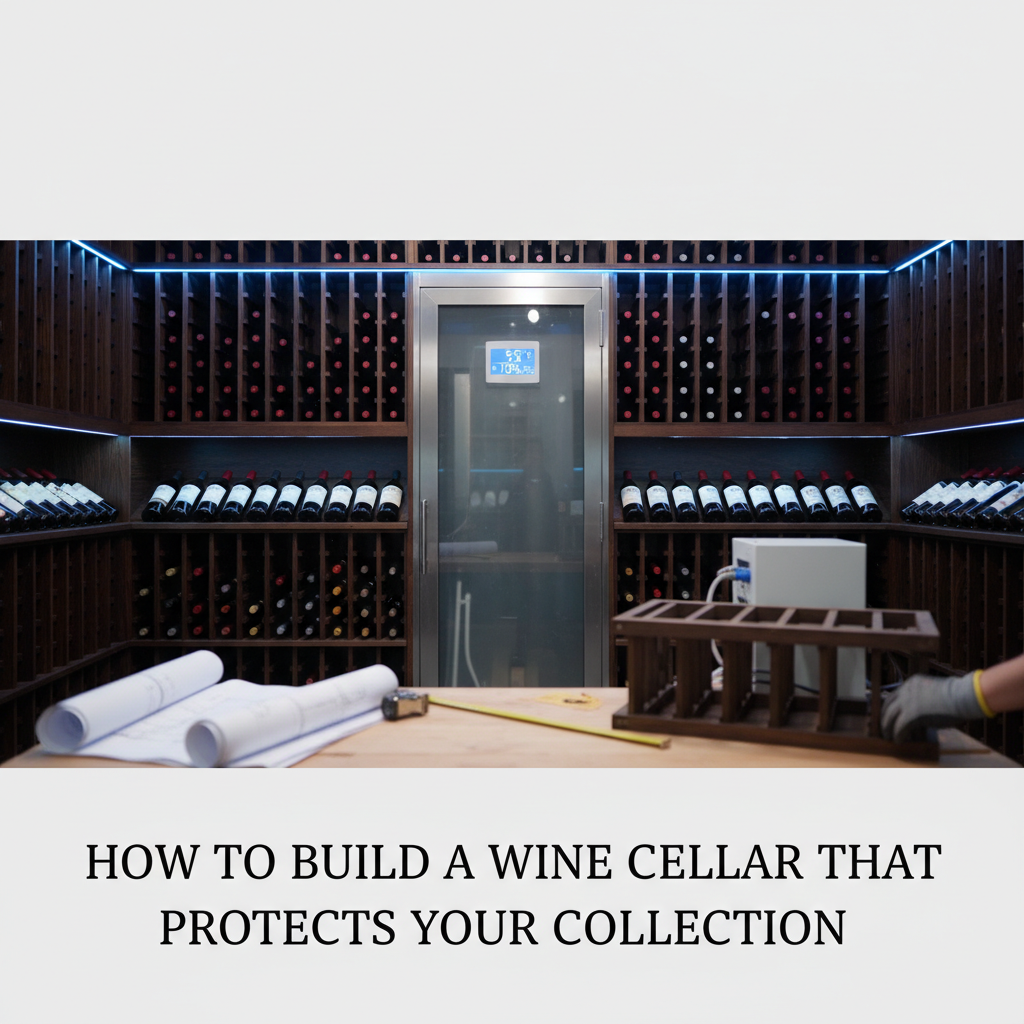
James Sullivan is a wine enthusiast with over 20 years of experience visiting vineyards and tasting wines across California, Oregon, and Europe. He has been writing about wine and winemaking techniques since 2005, sharing his passion for discovering new varietals and understanding what makes great wine.

176 Articles
View All Posts

Subscribe for Updates

Get the latest articles delivered to your inbox.