What Does Sediment in Homemade Wine Actually Look Like
Homemade wine has gotten complicated with all the conflicting advice flying around. You bottle your batch, feel genuinely proud of it, then crack it open three months later to find mysterious stuff settled at the bottom of the glass. Panic sets in. It really shouldn’t.
As someone who’s been fermenting wine in a spare bedroom for seven years, I learned everything there is to know about what that sediment actually means. Today, I will share it all with you.
There are three main types of sediment you’ll encounter — and each one tells a completely different story about your batch. So, without further ado, let’s dive in.
Tartrate Crystals
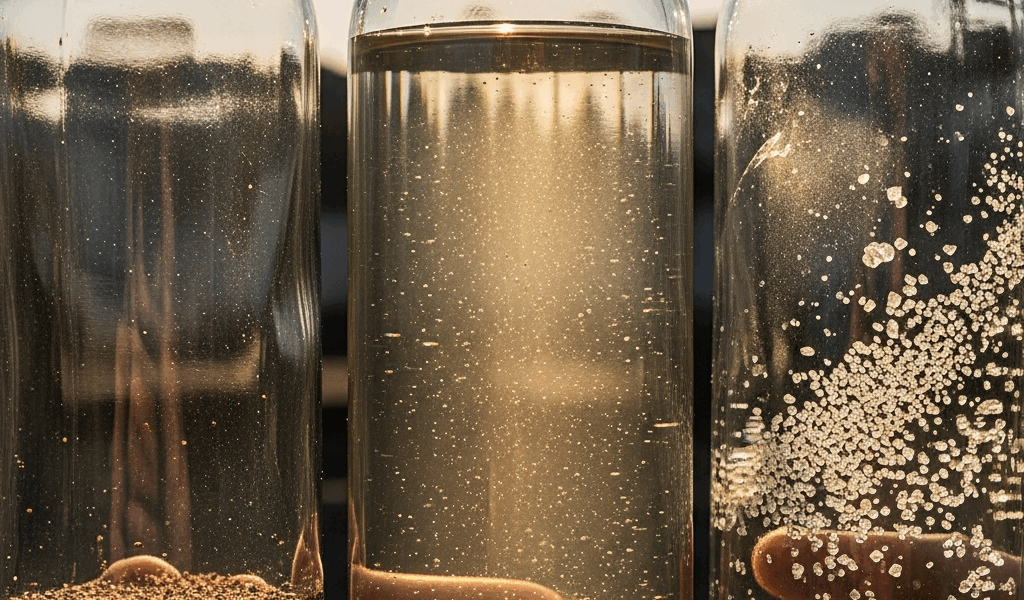
These are the sparkly ones. Tilt your bottle against a lamp or flashlight and you’ll catch glassy, crystalline particles clinging to the bottom and lower sides. In whites, they’re colorless or faintly yellowish. In reds, they go purple or brownish. They don’t dissolve when you swirl. Run your finger over them — they’re genuinely hard, almost like coarse salt.
Tartrate crystals feel like the residue left in a fancy champagne flute that’s been sitting on a shelf for weeks. That’s essentially what they are.
Lees and Yeast Sediment
This one shows up as a powdery or fluffy layer — tan, gray, sometimes a dull beige. When you tilt the bottle, it doesn’t cling. It flows slowly, almost like flour suspended in water. Shake it gently and the whole thing swirls upward, clouding the wine. Under direct light, it looks more like a haze than any kind of distinct particle.
It’s dead yeast cells. Spent proteins from fermentation. That’s literally all it is.
Protein or Pectin Haze
Probably should have opened with this section, honestly — it’s the trickiest one to spot. Sometimes sediment skips the neat settled-layer thing entirely. Instead, the whole bottom portion of the bottle just looks dull or slightly cloudy. Barely visible. A faint turbidity. This is usually pectin — especially if you used real fruit — or unstable proteins still floating around in suspension.
But what is pectin haze exactly? In essence, it’s fruit-derived compounds that never fully cleared. But it’s much more than that — it’s a sign your clarification step needed more time.
Which Types of Sediment Are Completely Fine
Tartrate crystals and settled lees mean absolutely nothing is wrong with your wine. Nothing.
Tartrates form because wine carries natural acids and potassium compounds. Drop the storage temperature — a cool closet, a basement corner — and those compounds bond and crystallize. Not contamination. Chemistry, working exactly as it should. It actually signals your wine wasn’t over-filtered or hit with chemical stabilizers that would’ve prevented this whole natural process.
I made a 2021 Riesling-style white from a Vintner’s Best kit. By month four in my 58°F storage area, roughly a quarter teaspoon of tartrate crystals had formed on the bottle bottom. The wine tasted cleaner afterward — crisper, sharper in the good way — because those settling compounds took some of the harsh edges with them. That’s not coincidence. That’s chemistry doing its job.
Yeast sediment works the same way. Fermentation ends, yeast cells die, they sink and compact into that powdery layer. This happens in commercial wine. You’ve probably seen it in natural wine bottles from small producers — they treat it as a mark of authenticity, and honestly, they’re not wrong. The sediment has zero flavor impact once it settles. Don’t pour the last half-inch when serving. Simple.
Leave a bottle another six months and tartrates might vanish entirely. Lees compress further, become more compact. Neither is a problem. Both are signs the wine developed without aggressive processing. That’s what makes sediment endearing to us homebrewers.
When Sediment Is a Warning Sign You Should Not Ignore
Here’s where you need to stop and actually pay attention.
Open the bottle. Look for three specific things: visible bubbles rising from the sediment layer, a slimy or ropy texture where you expected powder, or a smell that just doesn’t read as wine.
Active Re-fermentation
Bubbles actively rising from the sediment layer means the wine is fermenting again inside the bottle. CO2 pressure is building. The cork might be sitting slightly high, or you’ll hear a hiss when you open it. This happens when residual sugar remained in the wine at bottling — then warmth, plus dormant yeast, kicks fermentation back into gear.
Don’t drink it yet. The wine isn’t ruined, but it’s unstable. Bottle re-fermentation can explode glass under pressure — don’t make my mistake of storing an early batch in a warm garage in July. Stand the bottles upright in a cool spot for three days. If the bubbling stops, transfer to a carboy and let fermentation finish, or refrigerate everything to halt the process. Either way, plan to drink within a few weeks.
Microbial Contamination
This is the one that actually kills a batch. Look for strands — not powder, actual wisps or thread-like structures in the sediment. The texture reads slimy, almost oily. The smell test is definitive here: nose the open bottle. Vinegar. Nail polish. Rubber. Anything overtly foul. That’s bacterial infection or wild yeast that got in somewhere.
One tiny sip confirms it immediately. Acrid. Sharply wrong. You’ll know.
There’s no recovery. Pour it down the sink and clean every piece of equipment thoroughly with Star San before your next batch. One bad batch honestly teaches more than five clean ones. Don’t make my mistake — I tried to save a contaminated grape batch in 2019. That was a wasted month.
Residual Sugar Indicator
Sediment smells fine, looks normal — but you remember the wine tasted sweet at bottling, and it’s been sitting somewhere warm for weeks. Re-fermentation could still be creeping along slowly. The sediment layer might be thicker than expected. There might be a faint fizz you didn’t put there intentionally.
Same move: refrigerate immediately, drink within a few weeks.
How to Handle Sediment Before You Pour or Store
- Stand the bottle upright for 24 hours before opening. This lets everything settle completely to the bottom instead of staying suspended throughout the wine. I use a $4 wine rack from IKEA specifically for this step.
- Pour slowly by candlelight or a flashlight beam. Tilt the bottle at a shallow angle and watch the neck as you pour. The moment you see sediment beginning to flow toward the neck — stop. You’ll sacrifice maybe half an inch of wine. That’s a fair trade.
- Decant if you’re serving to other people. Pour into a clean glass pitcher while watching the bottle neck. Sediment never makes it into the pitcher this way. The wine pours completely clear, and nobody at the table needs to know there was ever anything at the bottom.
- Consider cold stabilization for future batches. Before bottling your next white wine, place the carboy in a chest freezer at 32–35°F for 10–14 days. Tartrates precipitate out in bulk — not in individual bottles later. Standard practice for whites. Genuinely worth the extra wait.
How to Prevent Excessive Sediment in Future Batches
Less sediment in the bottle starts with better habits earlier in the process — weeks or months before bottling day.
Rack regularly. Move the wine from one carboy to another every 4–6 weeks through the first three months, then monthly after that. Each racking leaves sediment behind and clarifies the wine progressively. Winexpert and Easier Cleaner Winemaking both include racking tubes in their kits — replacements run under $15 if yours cracks.
Use fining agents before bottling. Bentonite runs about $8 per pound and clears suspended haze in 48 hours — I’m apparently a bentonite person, and it works for me while Sparkolloid never quite clicked for my grape batches. Sparkolloid might be the best option for fruit wines, as those batches require gentler clarification. That is because fruit pectin responds poorly to aggressive fining. Add whichever you choose 10 days before bottling day.
Cold crash before bottling — drop the temperature to 50°F for three days. Everything that’s going to settle will settle. Then rack one final time and bottle from a clean carboy.
While you won’t need a commercial filtration rig, you will need a handful of basic tools: a good racking cane, a wine thief for sampling, and either a chest freezer or access to a genuinely cold space for cold crashing.
First, you should nail your sanitation process — at least if you want to eliminate contamination as a variable entirely. Everything else follows from that.
A bottle with a light layer of tartrate crystals or a whisper of yeast sediment isn’t a failure. It’s a mark of honest homemade wine. The kind that wasn’t stripped and over-processed. You made something real. Own that.


Stay in the loop
Get the latest winemaker's friend updates delivered to your inbox.